March 21, 2011

Never Spoiled, Always Reworkable

Last Wednesday I set out with a distinct purpose: assemble and paint my first purse cake. I had everything in order to be successful and give myself plenty of time for some detailed painting to make this Vera Bradley cake come to life. Two batches of fondant had been made, white chocolate buttercream frosting was done, cakes were cooling and the cake board had been covered. It would be a quick assembly and then on to painting. Wrong! Four hours into basic assembly I encountered what seemed like an entourage of problems.

First, the frosting had hardened in the fridge and had to be re-beaten. Then I forgot to cut the purse shape out of the cake before doing the crumb coat of frosting. An hour later after having to remove cracked fondant from the frosted cake, I was forced to make a new batch of fondant. Deciding to use my tried and true recipe for marshmallow fondant, I confidently poured my melted marshmallows into the mixer with powered sugar. My heart sank as I watched crumbs form. What was happening! I started to wonder, "Is there a lesson I'm supposed to be learning Lord that I'm missing or is this just not what I'm supposed to do?" I was on the verge of tears wanting to give up.

Slowly things came back together. I had enough fondant left over from covering the cake board to cover the cake. Praise God! I was able to find a new use for that waiting roll of toilet paper, using it to hold up the gum paste handle while it dried, already in perfect position on the cake. Praise God! I was able to match the fondant piping around my purse to the same color as the gum paste handle, which involved using reds and pink; the colors I have the most trouble getting to come out. Praise God!

During the course of the day, while constantly facing a problem and having to rework and remold things to get it somewhat right, God brought to mind how he has molded us with his own hands as I was molding this cake. Like my cake that needed a little work to make it more perfect, I need to be reworked by my maker to make me more perfect. In Jeremiah 18:4 we encounter Jeremiah following instructions from the Lord to go down to the local potter's house. Jeremiah records from what he saw there, "And the vessel he was making of clay was spoiled in the potter's hand, and he reworked it into another vessel, as it seemed good to the potter to do." (ESV, 2002)

Each one of us is a sinner; we are spoiled. But God has so much love for us! We are his precious creation even though we fail him so often, he still loves us. He reworks us, fixing our bad parts and making us new we become something beautiful and of good use to bring him glory. I am ever so thankful that God didn't count me as lost, but took the time to rework me as he seemed was good to do. He chose to show me mercy. What an amazing gift!

Leveling, Filling and Frosting a Cake

Leveling: you will need two layers of cake, a serrated knife and a bag or container for the excess cake.


Step 1: Cut the dome off the top of each layer cake using a serrated knife. Take your time. You can take away, but cannot add back your cake. There will be a ring around your cake where the cake touched the pan. Use the top of that ring as a guide for cutting off the dome. I do this on a turn-table, rotating the cake as I cut ending my cut at the same spot I started from.


Step 2: Get down to eye level and spin your cake. Is it level? Carefully shave away cake to make an even surface. Again, take your time.


Leveled Cake
Bag your extra cake for cake balls! Can be stored in freezer until ready to make.
Filling and Frosting: you will need two level cakes, frosting (white chocolate buttercream recipe), piping bag with large round tip, off-set spatula(s) and turn-table (optional)


Step 3: Once both layers have flat tops, place one layer on your turn-table. Fill a pastry bag with frosting and attach your largest round tip. Pipe around the edge of your cake.
*This step can be omitted if you are filling with frosting. I typically fill cakes with Jams and therefore need this edge to keep the filling in.


Step 4: Place a large dollop of frosting in the center of the cake spreading to edges using an off-set spatula. I create fillings an 1/8 to 1/4 inch high. You can go as high as a 1/2 inch of frosting between layers. Place your second cake layer on top placing the cut edge to the filling.


Step 5: There are lots of crumbs on your cake at this point and you don't want them to show! A crumb coat grabs and holds them into the cake allowing a perfect layer of buttercream to be added later. Place a large spoonful of frosting on the top of your cake. At this point it is very important not to put your spatula back into your frosting bowl without whipping it off with your paper towel. You'll need that frosting later for your final coat and crumbs are your enemy! Using gently force, spread your frosting around the top of your cake pushing it toward the edges. There should only be a very thin layer of frosting. Push the frosting down and around the side of the cake. Wipe off your spatula and grab more frosting as needed to cover the whole cake. Wait 30 minutes to allow the frosting to crust and then apply your final coat of frosting.


Cake with crumb-coat
Step 6: No frosting should go to waste! Either save it to make cake balls later along with your leftover cake, or toss the cake and frosting in a bowl and enjoy a treat while you wait between frosting layers!

The source of my stress and insight into the Lord


***Those of you who know how to make a purse cake will notice that the above steps and the completed frosted cake is not how one would start off a purse cake. Well, this is how I did. Add another mini disaster to the list!

March 14, 2011

Blessings for God's People

Get out your green! St. Patrick's Day is almost here! As we salivate over thoughts of shepherd's pie and corned beef with cabbage (keep the drool off the keyboard) let's talk about a change in words: luck to blessings. The word "luck" is deeply embedded into our society. Sports players refuse to wash articles of clothing to keep up a "lucky streak", numbers and colors are defined as being "unlucky", we recall so many things in our day as being "luck" that keep us out of trouble or reward us in some way. My dictionary defines these two differing words as follows:

Luck: success or failure apparently brought by chance rather than through one's own actions. 


Blessing: God's favor and protection.

I don't know about you, but I would much rather have a blessing than have luck! Imagine, the creator of the universe looking on your little life offering you protection from the driver that doesn't appear to have a clue you are there, or favor in the form of being the winner of a drawing after a hard week. If we know and understand that our God is really in control over everything happening to this spec called Earth, is there really any luck or are we just blessed beyond our wildest dreams!

This week, instead of looking for luck to appear, look around you. How does God bless you each day even in very small ways? While you look for God's favor in your life, sink your teeth into this sweet treat to celebrate with the Irish!


Shamrock Sugar Cookies: how to decorate


You will need:
food coloring
piping bags
#2 tip for piping
#3 tip for decorative flooding
#4 tip for flooding or a plastic squeeze bottle
toothpicks
sanding sugar (optional)

Color and thin royal icing as desired and pore into decorating bags fitted with the appropriate tips as indicated above.

Outline cookies keeping piping tip at a 45 degree angle. Icing should flow easily from the bag. If it's too hard, squeeze icing back into bowl and add a teaspoon of water at a time to thin.


Once cookies are outlined, flood with thinned royal icing. Icing flows out quickly without squeezing the bag. I prefer to use a plastic sauce bottle for this rather than a piping bag. These are available at the 100 Yen store for those in Japan. Do not completely fill your cookie. Overfilling will cause frosting to run over the sides. Using a toothpick, push the frosting to the edges of the piped outline and filling in any gaps in the frosting.


While the frosting is still wet, you have the option of adding additional decor to your cookie.


To decorate with sanding sugar, set cookie on wax paper and sprinkle sugar on.
Let cookie dry for at least 2 hours before shaking off excess sugar.
(removing excess sugar may cause the wet frosting to slide off the cookie)
For a feathered effect, pipe in stripes using your #3 tip and a thin icing.

Using a toothpick, drag the icing down. Starting at the top of
the cookie, draw a line down through the stripes. 
Add pocka-dots by dropping dots of thinned icing into the frosting.
To make bigger dots, squeeze out more frosting.

These are just a few ideas to get you started. Have fun with your cookies and get creative!

Frosting needs 12-24 hours depending on humidity to completely dry. Do not stack cookies until they are dry. Store sealed in an airtight container or bag at room temperature for up to 3 days.

March 7, 2011

Hidden Treasures

Have you ever been on a treasure hunt? I remember in high school, our church youth group would get together and race around town finding clues that our leader prepared for us. It was always the highlight of the year! It was the curiosity and anticipation of what was waiting at the next stop that kept us going. Each clue had been carefully laid out so we could find it and was labeled so that we would know it was for us.

I still love finding hidden treasures! It's always a fun surprise! Finding that twenty dollar bill in the wash that fell out of a pocket, an item lost and then found months later or that item at the store that you desperately needed and they actually had it (those in Okinawa know the excitement I'm talking about!). Our heavenly Father has so many treasures laid out of us to find if only we would open our eyes and hearts to receive them. Isaiah 45:3 says, "I will give you hidden treasures, riches stored in secret places, so that you may know that I am the Lord, the God of Israel, who summons you by name." (NIV, 2011) His treasures: his never ending love, his grace, his son are all there, labeled clearly with our names. If only we would seek them, what amazing things we will find!

Find a sweet treasure inside these Boston Cream cupcakes!

Genoise Cake:
1 1/4 cups all-purpose flour
1/2 cup cornstarch
3 eggs at room temperature
1 cup sugar
1/2 cup sour cream at room temperature
5 tablespoons melted butter
1 teaspoon vanilla extract

Preheat oven to 375 degrees Fahrenheit.

Sift the flour and cornstarch together two times. Set aside.

In a mixing bowl, add eggs and sugar whisking to combine. Heat using a double boiler until mixture reaches 110 degrees Fahrenheit. Continue to whisk while warming mixture.
Double Boiler: large saucepan filled half-full of water,
boil and put mixing bowl on top of saucepan.
I used a candy thermometer to assess the temperature.
Attach mixing bowl to mixer. Using whip attachment, mix on medium high speed for 4-5 minutes until foam is three times the original size. When done, the mixture will form a ribbon as it falls off the whip.
Before whipping
Full volume
Ribbon effect
Fold in the cornstarch and flour using a spatula. Fold in the sour cream, melted butter and extract.


Gently spoon into prepared muffin tins filling each cup 2/3 of the way full.


Bake for 15 minutes or until tops are browned and cake springs back when pressed in the center. Cool on wire rack.

* May omit sour cream. Some taste testers preferred the cupcakes without sour cream.

Vanilla Pastry Cream:
2 cups milk
1/2 cup sugar
1/4 cup cornstarch
3 eggs room temperature
1/2 tablespoon vanilla extract
3 tablespoons melted butter
1 cup whipping cream (optional)

In a medium saucepan, heat milk and half the sugar until it starts to simmer.

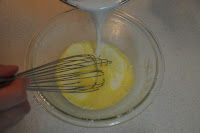
Whisk remaining sugar, cornstarch and eggs in a large bowl to combine. When milk is heated, slowly add half of the milk to egg mixture whisking constantly (called tempering). Put the saucepan back over medium heat and add the tempered eggs to the saucepan whisking constantly until the sauce become thick and reaches a full boil. Remove from heat.
Tempering eggs
Add tempered eggs to milk left in saucepan
Add extract and melted butter mixing until smooth.

Place in bowl and cover with plastic wrap pressing the plastic on top of the cream to prevent the top from forming skin. Put in refrigerator to chill, about three to four hours. 


Before filling cupcakes, can fold in whipped whipping cream creating a lighter filling.

To fill, cut a hole in center of cupcakes. Cut a larger whole to add more cream.

Pipe in cream using a pastry bag and top cupcake with ganache.

Ganache:
1 cup whipping cream
1 cup chocolate chips

Heat cream and chocolate in a double boiler until chocolate is melted stirring constantly to prevent burning. 


Enjoy! Goes great with a cup of coffee!

March 1, 2011

God's Inspiration Beauty

We're in the middle of cherry blossom (Sakura) season in Japan. We here in Okinawa are seeing the vibrant pinks fade away to reveal new leaves, but in mainland blossoms are beginning to open. There are two Sakura trees in my neighborhood that I pass by daily. Each year, they begin to bloom in early February lasting almost the whole month. I can't help but look at them in amazement at the beauty that God can create and praise His name! His creation shouts His glory and for the month of February, I experience a piece of that as I make my way through the neighborhood. Romans 1:20, "For his invisible attributes, namely, his eternal power and divine nature, have been clearly perceived, ever since the creation of the world, in the things that have been made." (ESV, 2001)

Being inspired by the beauty that God created to show his power and divinity, I've created my own version of His Sakura in sugar. 


Today's How To: Painting with Pearl Dust


1. You will need vodka, pearl dust, a paint brush, small mixing container and a teaspoon


When painting, you need to use a liquid that has a high alcohol content. Extracts can also be substituted for vodka though they are more expensive to use. The alcohol will evaporate off your cake leaving nothing but color behind.


2. Fill your teaspoon a quarter way full of vodka. I use the teaspoon rather than a quarter teaspoon to measure because it's easier to aim into the bigger vessel! Pour this into your container or paint tray and add about the same amount or less of your pearl dust. The more pearl dust you add, the darker the finished product and vice versa. It doesn't need to be exact. Mix the two together well.


Tip: mix your vodka and pearl dust every few minutes while painting. The pearl dust will want to settle at the bottom. Your mixture should always look shiny in the paint tray. If it looks dull, give it a mix!

3. To paint, dip the tip of your brush into your paint. Never dip the whole brush, your paint should not extend above the lower third of your brush. Add your pearl dust to items on your cake you want to shimmer! Allow them to dry completely before adding to your cake.


I chose to add gold pearl dust as well to my flowers layering it on top of the pink.

My finished product: