August 11, 2012

Photo Session

My husband and I have been so blessed by so many great friends while living in Okinawa. Living so far away from the states, you lean on each other more and friends become just as close as relatives. I miss all of them dearly.

We've been blessed by all of our friends in one way or another, but I'd like to share how one friend blessed me with her gift of photography. Svetlana stepped up to help me in the first grade Sunday school room and I got to know her more each week. She is an amazing woman! Svetlana was so sweet to offer to take photos of me with a cake so I could have a photo to place on this site. We only had about two hours for set-up, lighting adjustments and the actual photos! Not enough time at all, but Svetlana did an awseome job! Here are a few of the best photos she took in that short time.


Thank you Svetlana for beautiful photos that I can now show off on my blog! I had so much fun taking them and am so glad God gave us the opportunity to have a few hours to take them.

Two are better than one, because they have a good return for their work:  If one falls down, his friend can help him up. But pity the man who falls and has no one to help him up!

Ecclesiastes 4:9-10


April 29, 2012

Gumpaste Tissue Paper

It's been too long since I've been able to update my blog and I have several posts waiting to be written! Live has gotten a little crazy (okay a lot crazy!) after God sent our family on a different journey to move back to the states than we expected when He called us to adopt a baby boy who was due to be born on April 1st. We were not due to leave Okinawa until May 5th giving me plenty of time to finish up cake orders and have the full month of April to shop, eat, pack and visit with friends. I remembered all the craziness from our move to Japan and knew what to do to avoid it. Well, God allowed me to plan all that, but it wasn't what He had in store for us!

In late February (as in the very last week), we were asked by our adoption agency, Bethany Christian Services, if we would be willing to be the adoptive parents of a newborn baby boy who was due to arrive April 1st. There were two other families the agency was considering before us, but we said we were willing if they were not. A week later, we recieved word that we would be this baby boys parents. It honestly was not a shock to either of us! We both looked at all that needed to happen to get me to Florida two month earlier than planned and knew this had God written all over it and He wanted to show us how big and possible He can make things! We jumped in and chose to trust and follow, that was the only thing we could do! So our adventure began as every single plan we had changed.

David was actually born early on March 22, exactly three weeks from the day we were told he would be ours! Getting through all those steps to execute an international move in three weeks and bring our baby boy home took precidence over writing. Needless to say, I've been a little busy! It's been an amazing journey and it is simply awesome to see what God has done for us from getting me quickly off the island, providing space in the one kennel facility on-base in Okinawa for our dog to stay at for almost 4 weeks on short notice, providing us with a brand new house that is in the process of being built and will be ready no later than the date our household goods will arrive from Japan (that all took place in 3 days!!!), opening the hearts of family to allow David and I to stay with them for over a month and providing tickets and the way for my husband to fly off the ship during a deployment and get back to Okinawa to fly on the same flight as me all the way to Florida. There is no impossible with our God!

Leaving Okinawa was a whirlwind and a very emotional adventure. I wasn't expecting to have to say good-bye to all my friends and close to 100 children I taught at church so soon. Some I will see again, but in most cases, our paths will more than likely not cross again until Heaven. It was exciting to share with everyone that God was giving us our first baby after waiting for 4 years, but it was still hard to then inform them I was leaving and not returning. A hard concept for many of the four and five year olds I taught to understand. 

Before I left, I was busy packing up things in our house to leave less work for my husband to do by himself when he returned and was also finishing several cake orders. I finished off my cake adventures in Okinawa on a high note, the best way! This last cake is a personal best for me in quality and skill. I got to repeat the concept of a gift box cake, but in a very girlie, fun way. This cake was for a diva themed baby shower and is my absolute favorite cake so far!

My favorite element on this cake is the tissue paper coming out of the box. It's such a neat feature and couldn't be easier to accomplish!


Gumpaste Tissue Paper...

This is the second time I've gotten to add this element to a cake and it is just as easy and effective as the first time! The key is to start three to five days in advance (or even earlier) and make more pieces than you think you need. It is neccessary to break apart the dried pieces to fit into your designated opening and just when you think you are done, there always seem to be hidden gaps that need to be filled!

Before starting, it's best to prep your cookie sheets to dry the pieces on. Take a piece of cling wrap that is about 3 inches longer than your cookie sheet and set it on the sheet loosely. I prep at least two cookie sheets for an eight or ten inch cake.


Now we're ready to roll out the gumpaste. My pasta machine works great for this step! Before rolling the gumpaste through the machine, it does need to be rolled to about and eighth of an inch thick allowing it to roll smoothly through without jamming up the rollers. Color the gumpaste before starting this. I preferred to keep mine white for this project.


Rolling the gumpaste through the pasta machine is the easiest and quickest way to achieve a consistant, realistic end-product. I roll mine through three or four times until the gumpaste is the thickness I want. Use the machine just like you would for pasta, starting on the thickest setting and going down one notch at a time to ge the desired thickenss. This step can certainly be accomplished by hand with a rolling pin, the process will just take longer. 

Do be sure to clean your pasta machine well, wiping the rollers from the bottom with a damp paper towel. Turn the rollers on and shove the paper towel up into the rollers, sliding it back and forth until all the gumpaste is removed. Do the same thing with a dry paper towel to remove all the moisture. Never clean the machine from the top with the rollers on!


Lay the rolled gumpaste out on a surface to cut. Use a pizza cutter to cut smaller pieces of "tissue paper" from this long piece. I cut mine into wide rectangles.


With your pieces cut, it's time to add realism to them! Place one piece at a time onto the cling wrap lined cookie sheet and crinkle both the pice of gumpast and the cling wrap. This couldn't be easier as there is no right or wrong way for the finished product to look! You just don't want flat pieces of tissue paper.  


Set the cookie sheets in a safe place to dry for at least three days and then add to your cake using royal icing in the same color as your gumpaste to adhere them to the cake. I find it neccessary to break apart the pieces to get a more realistic look and fit them in securely. Don't forget to look for any gaps!


March 20, 2012

The Perfect Cupcake


Do you ever struggle with getting something simple right? I do all the time! It always seems to be something silly that the rest of the human race has figured out, but I cannot seem to grasp. Recently in my kitchen that problem has presented itself in the small delicate yet delightfully delicious form of a cupcake. For the life of me, I have struggled to make that perfectly baked, not to high yet not to low cupcake that melts in your mouth. It has not helped that my homemake cake recipes result in cakes that rise very differently and some batters look like they fill the pan more than others. It's been a pickle! I have chosen to avoid making customers cupcakes like the plague just to stay away from all the trouble they cause me!

God is good and after allowing me to fail for a while He finally let me experience what I have waited months for: the perfect cupcake! (it is a humbling experience that in the end I am glad for and rejoice even more in the victory He gives me, even over a silly cupcake!) It turns out the answer was simpler than I thought and surprisingly consistent with each of my homemade cake batters. Allow me to share with you my problem solver: a very handly large ice cream scoop!


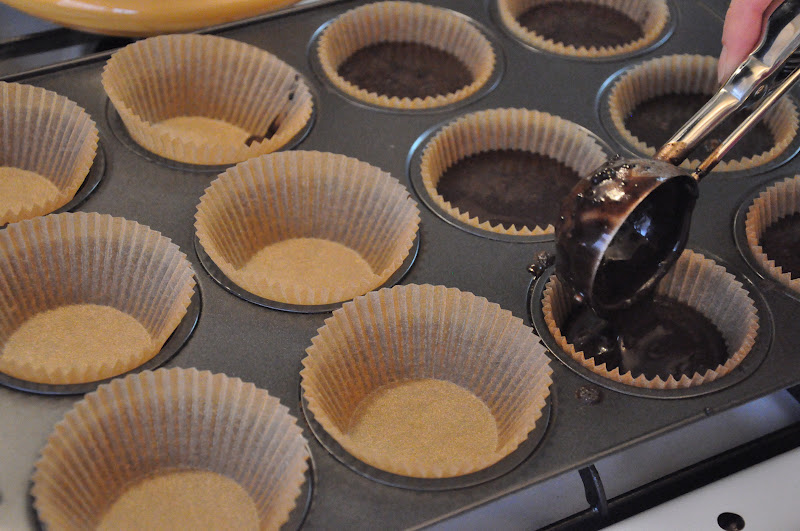
I have three different sizes of ice cream scoops to use for baking. I've typically only used them for cookies, but it turns out the largest of the sizes is the perfect solution to my cupcake problems! This large scoop measures two inches wide.

The process is quite simple. Fill the two inch scopper with cake batter and drop into one lined cupcake cup. How easy is that?!


The baked result is a cupcake that just barely pops up over the top of the cupcake liner and has a slight done offering a perfect base for a dollop of frosting and a few fun decorations!


This struggle with getting the perfect cupcake reminds me of our walk as Christians. You don't accept Jesus as your Saviour and then have a ticket to perfection. It's an ongoing, constant change and continual growth toward perfection though we can never reach that goal until we're in Heaven.

 I'm encouraged by the apostle Paul who I consider to be an amazing man living for Christ! If anyone could be considered as reaching perfection, it would be him, but as he so humbly points out many times in his letters, he too is still striving toward the goal and failing to reach it, though still striving. In Philippians 3:12 Paul writes, "Not that I have already obtained this or am already perfect, but I press on to make it my own, because Christ Jesus has made me his own." Jesus has loved me as a sinner. He chose to die for me while I still lived in sin. He made me His own. Because of what Jesus did for me and the love He has shown me, I press on working toward perfection, sometimes missing the goal completely, sometimes getting close, but not quite reaching it yet. I want to make Jesus proud of me, so I press on.

I could have given up on my cupcakes, called it quites and just refused to make them for any occasion. But I didn't. I strove to take something that looked horrible and was far to dry to be considered sellable and strove toward perfection. It's all part of the process of reaching a higher goal as a baker just as I strive to be more like Christ everyday growing as a mature Christian woman who loves and fears the Lord.

Always striving toward perfction,


Shannon


February 28, 2012

Carving a Couch Cake


Back in September, I had this great idea to surprise my husband with a special cake for his birthday. I wanted to create a couch and have us and our pets on it. We love to go out on adventures together, but our favorite way to relax is cuddling on the couch watching our favorite movies and shows. The story goes (like most of my brilliant ideas) that it got busy making cake for other people and his deployment schedule kept changing so this brilliant idea was never created. No dessert, in fact, was made for his birthday. I did make a nice dinner, but served him the pieces of a leftover dome from a cake I made for a customer. Another idea failed. But at least he technically had cake! 

Another brilliant plan had failed (story of my life), so I forgot about it and figured I'd try to be a better wife next year. Last Friday I got a surprise phone call from my husband while he was still at sea. They were going ashore and getting on a military flight to come back home before the next part of the excersice started. Yay!!! Always a great surprise to have him home even if only for a few weeks! This cake I had planned to make in September immediately came to my mind (thank you Jesus!) and I resolved, without looking at the timeline, to create a couch cake with our family sitting on it. 

It was a wirlwind of a weekend, and I was exhausted by the time I collected my husband from the airport, but it was all worth it! He was completely surprised and so excited to see us and our furry kids looking like we would during a normal evening at home (yup, hearts really can be seen floating above our heads wherever we go together!). Because it was for my love, I was able to put in lots of extra details including his favorite reindeer comfy pants, Emma (our dog's) pink belly, our wedding rings on fingers, his high regulation haircut and my painted toes and comfy pants.

There is no greater joy than creating something special for the one's you love and this certainly is no exception. It is out of pure love and complete joy that I lost sleep, set aside the messes in the house (those of you who know me understand how hard that is for me!) and put so much detail into this original and unique cake just to put a smile on my husband's face after too much time away. I am greatly blessed with a godly husband and it's been so fun to make this sweet gift of sugar for him.

"So if there is any encouragement in Christ, any comfort from love, any participation in the Spirit, any affection and sympathy, complete my joy by being of the same mind, having the same love, being in full accord and of one mind. Do nothing from rivalry or conceit, but in humility count others more significant than yourselves."

Philippians 2:1-3

February 19, 2012

Simple Heart Cookies


A month ago I looked ahead on my calendar seeing what special lessons I wanted to teach to the kids at church and what truths about God I wanted to hone in on. I saw Valentine's Day coming up and knew I wanted to do something special. I found my heart cookie cutter, started looking for sugar cookie ideas and then life happened. Valentine's Day came and went and no cookies came out of my kitchen for the kids. Plan failed.

Being a little late no longer bothers me as it becomes a bit of the norm in my life, so I became determined to have cookies ready to pass out to my Sunday School class the Sunday after Valentine's Day. Yes, this would work out great! And do kids really care when they get sweets? I didn't think so! God in His goodness knew how He made me and worked it out perfectly! Love that! Our lesson this week was on the Life of King David (yes, the whole life... that alone was a big enough challenge to teach in 15 minutes to first graders!).

Crafts and sweet gifts of hearts matches a lesson on David perfectly as we discussed how God felt about David and comparing him to King Saul. David wasn't the most handsome and he sure wasn't the tallest. He was a young shephard when the prophet Samuel was intructed to go to Bethlehem and annoint this new king that would replace the fallen King Saul. No one was more shocked than David's own family! God used David to teach us that He does not look at our outside apperance; He looks on our hearts.

You may be beautiful on the outside, well dressed, always looking your best, but what is the state of your heart? Is it full of hateful thoughts, dishonestly, unfaithfulness and disobedience to God? Or are you maybe a bit of a mess on the outside but proudly holding Jesus in your heart striving to be more and more like Him each day? The way into our eternal home is not by our outward apperance or even by the works we do. It's only by Jesus. If you don't proclaim Jesus as your Savior, holding him in your heart, you will not be admitted. No exceptions.

Maybe this Valentine's Day will be a time for you to recommit your life to Christ or discover Him for the first time. God is waiting patiently for you and is looking at your heart and sees it's condition and yet still loves you as His own son or daughter. Choose Jesus.
"But the Lord said to Samuel, "Do not look on his apperance or on the height of his stature, because I have rejected him. For the Lord sees not as man sees: man looks on the outward apppearance, but the Lord looks on the heart.""
1 Samuel 16:7


Decorating a Simple Heart Cookie

For more detailed instructions on making a royal iced sugar cookie click here.

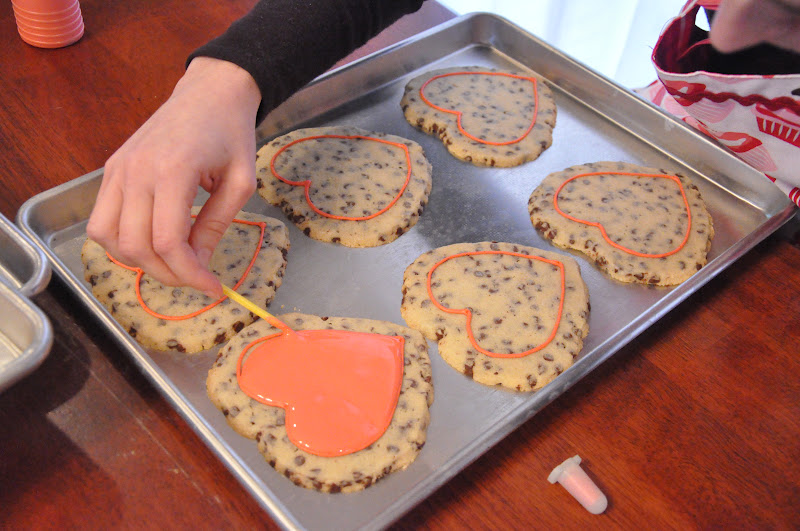
Start by outlining each cookie with a piping bag and a #2 round tip. Give yourself about a quarter inch edge for lace around the iced heart.

Flood each cookie with thined royal icing using a toothpick to spread the icing around the cookie.


Using a piping bag and a #2 round tip filled with white royal icing, pipe a small heart into the wet icing.


Again using your white icing bag and the #2 tip, pipe half circles around the edge of the cookie overlaping the lines when strating a new half round. 

Let your cookies dry for 24 hours before writting a special message or scripture using a food pen. The edible ink needs about 3 hours to dry depending on humidity before bagging the cookies.

Enjoy!


February 7, 2012

Gumpaste Star Spray on Wire

"He determines the number of the stars; he gives to all of them their names."
Psalm 147:3-5

What you need:
gumpaste
tylose glue
cutter
20 or 18 g wire
small cell rolling pin
cell board
parchment or wax paper
baking sheet


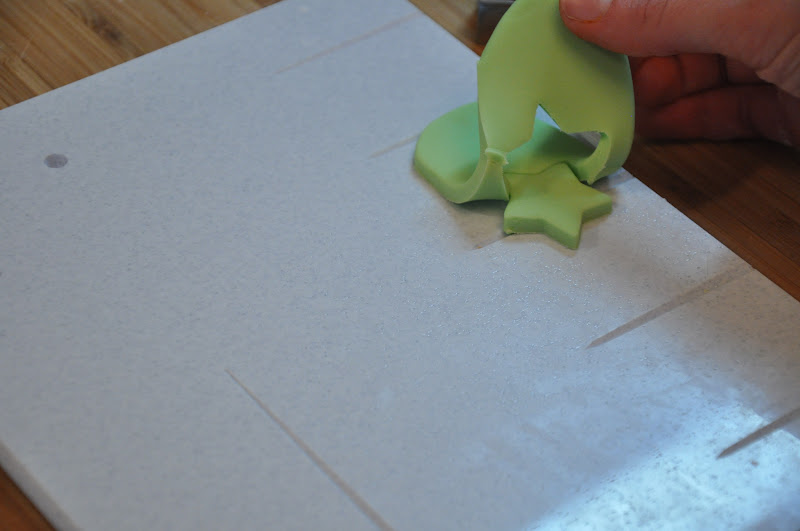
Starting with gumpaste in a sausage roll, use your cell pin to roll the paste over the cell board's lines to the desired thickness. For these stars, I rolled my gumpaste to about 1/4 inch thick.


Center your cutter over each line in the cell board. Pay attention to which end you want to be the top and bottom. The bottom of the cutter should be closest to the bottom edge of the board (the line in the board is thickest at the bottom edge).


Remove the access gumpaste and carefully turn your cut-out over. For the purpose of this tutorial, I only rolled enough paste for a single shape. To speed up the process, roll enough paste to cover the length of the cell board.


Dip the end of a wire in tylose glue tapping off the access.


Carefully slide wire through the raised portion of your shape. Place your index finger over the raised line to feel when to stop inserting the wire or, mark the length of the shape against the wire using your finger as a marker and then slide the wire in.


Gently hold the bottom of the shape against a paper towel to remove excess tylose glue (not shown in photos). Failure to do so will crause the shape to stick to the baking sheet.


Place finished shapes on a parchment or wax paper lined baking sheet to dry for at least 3 days before using. Turn shapes over after at least 24 hours to allow the opposite side to dry well. 


January 28, 2012

Carving a Path

This week, I was blessed with learning another new technique; carving out a path along the edge of a cake. One very special birthday boy asked for an action cake of Indian Jones specifically the mine cart chase. This carved cake creates the perfect stage for the edible adventures of Indiana Jones!

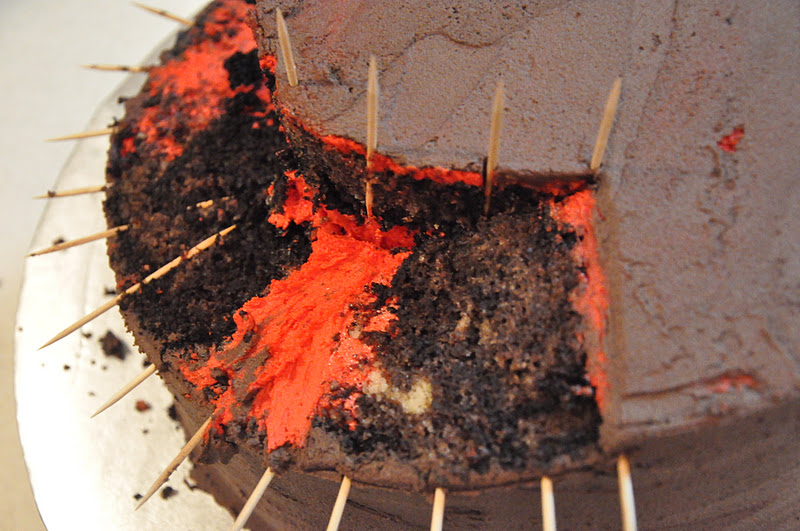
To get started, I cut both ten by two inch cakes layers in half to create four layers. Between each is a quarter inch of red buttercream to represent the lava in this action scene. Using chocolate buttercream, I crumb-coated the cake and let set for thirty minutes.


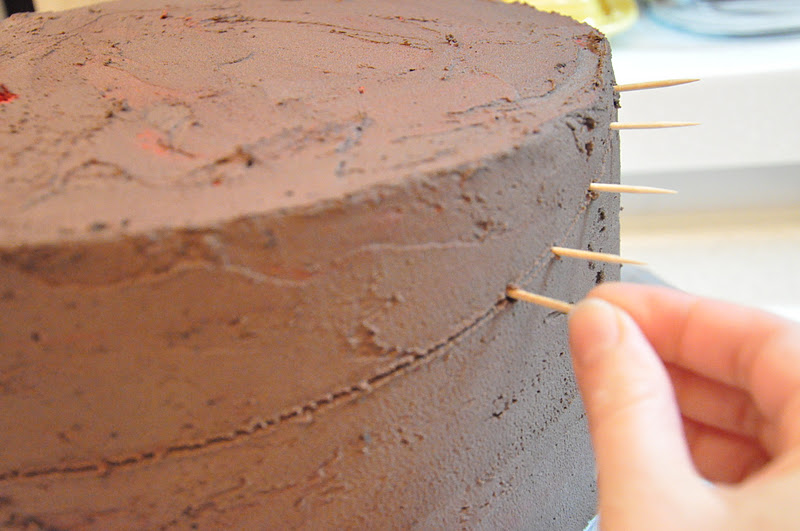
Using a toothpick, I marked a spiral line around the cake starting at the top and working my way down to the bottom edge. Having the cake on a turn table will make this step a breeze!


Insert toothpicks about every inch along the line to help maintain a smooth, even curve when carving. There is no room for mistakes!


The top of the cake also needs to be marked to keep the path going down your cake an even width. I needed lots of space so I chose to make marks two and a half inches in from the edge. Start across from the highest toothpick on the cakes edge and end just after the last toothpick on the bottom of the cake.


Using a serrated knife cut all along the outside edge of your cake just above the toothpicks. Be careful to not cut too deep. You can always go back and make a deeper cut.

Now start to cut into your cake using the top toothpicks to guide you. I found it easiest to work in chunks. Cut into the cake going a few inches in lenth then cutting the chunk of cake off. Working in smaller sections like this allowed me to see if the path was still level. It's also a lot of cake that's being cut off. It kept the job a lot neater.


The cake will have a nice curve when finished. 


Remove all the toothpicks and apply a crumb coat to the exposed cake.


Because there was so much cake cut off, so I opted to place it all on another cake circle along with a bag of extra buttercream and the leftover cookies (I crumbled those up and smashed them into the final buttercream coat to creat the look of a mine). These extras were boxed up and delivered to the customer for them to enjoy after the party or have on hand for extra serving as needed.


 The finished product:


 Trust in the Lord with all your heart, and do not lean on your own understanding. In all your ways acknowledge him, and he will make straight your paths.
Proverbs 3:5-6

Shannon